Automating Amazon EKS Deployment from Bitbucket with CodeBuild and CodePipeline

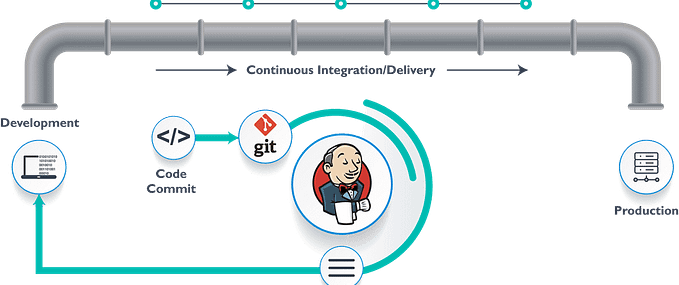
As application development speeds up, organizations need to move past traditional manual processes for building, testing, and deploying code. By implementing automated CI/CD pipelines on Amazon EKS, teams can achieve faster, more efficient deployments. Integrating SonarQube with Bitbucket allows for seamless code quality analysis, improving security and ensuring compliance throughout the development cycle. This approach not only boosts software quality but also accelerates deployment, enabling teams to deliver secure, reliable applications quickly.
In this guide, we’ll show you how to deploy applications to Amazon EKS using AWS CodePipeline, integrating with repositories like Bitbucket, Git, or CodeCommit (note: AWS CodeCommit, while less commonly used, works similarly to BitBucket and Git) to create automated delivery workflows.
What is EKS?
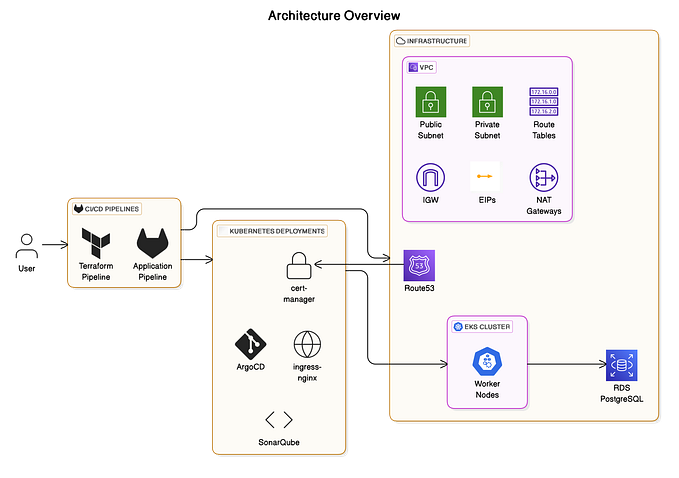
Amazon Elastic Kubernetes Service (EKS) is a managed Kubernetes service provided by AWS that simplifies deploying, operating, and scaling Kubernetes clusters in the cloud and on-premises. EKS abstracts much of the complexity involved in managing Kubernetes infrastructure, allowing developers and operators to focus on deploying applications and managing workloads.
Amazon EKS ensures that Kubernetes control plane components, such as the API server and etcd, are fully managed and run across multiple availability zones for high availability. It is compatible with standard Kubernetes, so applications and tools designed for Kubernetes work seamlessly with EKS.
Key Stages in Automating Deployments to Amazon EKS
Now that we’ve explored what Amazon EKS is, let’s dive into how we deploy applications to it. To automate deployments to Amazon EKS using AWS CodePipeline, the process can be divided into four key stages: Source, Test, Approval, and Deploy. In the Source stage, CodePipeline integrates with a repository like Bitbucket, CodeCommit, or Git to pull application code, including Kubernetes manifests (e.g., deployment.yaml). The Test stage runs quality checks, such as static code analysis or unit tests, using tools like AWS CodeBuild or SonarQube. In the Approval stage, a manual or automated approval process ensures that only validated changes proceed.
Finally, in the Deploy stage, CodeBuild creates a Docker image, pushes it to Amazon Elastic Container Registry (ECR), and applies the updated Kubernetes manifests to the EKS cluster using kubectl. This automated pipeline ensures a seamless CI/CD workflow with high-quality application deployments. Now, let us see how to implement this solution.
Prerequisites:
It is imperative to have:
- An Amazon EKS cluster
- An ECR repository
- Configure AWS CLI, kubectl, and eksctl
- The source code repository (e.g., AWS CodeCommit or GitHub or Bitbucket)
Pipeline Stages Overview
Here’s an overview of the stages involved in setting up the pipeline:
- Source (Code Commit/Git/Bitbucket)
- Test (SonarQube)
- Approval (Stakeholder)
- Build → Push to ECR → Deploy to EKS
Detailed Workflow
Now let’s dive into the detailed workflow to set up the automated pipeline.
- Source Code Management
- Use Git-based systems like GitHub, GitLab, or Bitbucket
- Branching strategies (e.g., GitFlow) are followed to organize the development
- Trigger the pipeline automatically on commit or pull request using webhooks or CI tools
2. Static Code Analysis with SonarQube
- Integrate SonarQube into the pipeline to run static analysis
- Configure quality gates to enforce coding standards and fail the pipeline if the criteria are not met
Example tools: Jenkins, GitLab CI/CD, or GitHub Actions can execute SonarQube scans
3. Approval Workflow
Incorporate a manual approval stage for stakeholders to review.
Example implementation:
- Use tools like CI/CD to set up an “approval job”
- Notify stakeholders via Slack or email for action
- Only after approval, the pipeline progresses to the build and deploy stages
4. Building and Deploying the Application
Build the Docker Image
- Use Docker to package the application and its dependencies into a container image
Example Dockerfile for the node application:
FROM node:20
WORKDIR /app
COPY . .
RUN npm install
CMD ["npm", "start"]
Push to Amazon ECR
We push the image to ECR for the rollback purpose
- Authenticate to Amazon ECR using the AWS CLI or IAM roles
- Push the built Docker image to ECR
aws ecr get-login-password --region us-east-1 | docker login --username AWS --password-stdin <account_id>.dkr.ecr.us-east-1.amazonaws.com


docker tag my-app:latest <account_id>.dkr.ecr.us-east-1.amazonaws.com/my-app:latest


docker push <account_id>.dkr.ecr.us-east-1.amazonaws.com/my-app:latest
Deploy to Amazon EKS
- Use Kubernetes manifests (YAML files) to define the deployment
Example deployment.yaml with the service file
apiVersion: apps/v1
kind: Deployment
metadata:
  name: my-app
spec:
  replicas: 3
  selector:
    matchLabels:
      app: my-app
  template:
    metadata:
      labels:
        app: my-app
    spec:
      containers:
      - name: my-app
        image: <account_id>.dkr.ecr.us-east-1.amazonaws.com/my-app:latest
        ports:
        - containerPort: 80
---
apiVersion: v1
kind: Service
metadata:
  name: my-app-service
spec:
  selector:
    app: my-app
  ports:
    - protocol: TCP
      port: 80
      targetPort: 80
  type: NodePort
We’ll explore detailed steps to set up the Pipeline.
A Step-by-Step Guide to Setting up the Pipeline
Creating the Code-Pipeline in AWS:
Stage 1: Connecting the AWS Code Commit to BitBucket
In the source stage, you need to give the source as Bitbucket for connecting to the Bitbucket cloud. And click the Connect to Bitbucket option to connect the pipeline to the repository. And select the repository for the pipeline and branch as well.
Stage 2: Integrating the SonarQube server for scanning the vulnerability
It should be added in the build stage. With the help of ENV and the Buildspec.yaml file we are going to analyse the source code in the SonarQube server.
Create a build project for the scanning
Here is the buildspec.yaml for the sonarqube scan:
version: 0.2

phases:
  install:
    commands:
      - pip3 install -q awscli --upgrade --user
      - pip3 install boto3
      - yum -q install -y jq
      - wget -qO /tmp/sonar-scanner.zip "https://binaries.sonarsource.com/Distribution/sonar-scanner-cli/sonar-scanner-cli-4.7.0.2747-linux.zip"
      - unzip -q /tmp/sonar-scanner.zip -d /tmp
  pre_build:
    commands:
      - echo Start code scan...
      - ./../../../../../../../tmp/sonar-scanner-4.7.0.2747-linux/bin/sonar-scanner -Dsonar.projectKey=$SONAR_QUBE_PROJECT -Dsonar.sources=. -Dsonar.host.url=$SONAR_QUBE_URL -Dsonar.login=$SONAR_QUBE_KEY
      - sleep 7
      - "curl -s -u $SONAR_QUBE_KEY: $SONAR_QUBE_URL/api/qualitygates/project_status?projectKey=$SONAR_QUBE_PROJECT> /tmp/result.json"
      - if [ $(jq -r '.projectStatus.status' /tmp/result.json) = ERROR ] ; then CODEBUILD_BUILD_SUCCEEDING=0 ; fi
      - echo Code scan completed on `date`
  post_build:
    commands:
      - echo "Checking SonarQube quality gate status..."
      - if [ $(jq -r '.projectStatus.status' /tmp/result.json) != "OK" ] ; then echo "Quality gate failed"; exit 1; fi

artifacts:
  files: '**/*'
ENV format for the scan:
Stage 3: Approval from the stack holders via SNS topic
Post the approval from the approver that we are assigning in the SNS topic the pipeline will proceed next steps.
Stage 4: Building the application in the image format and pushing the image in the ECR for the backup purpose and deploying the application in the EKS environment
Here is the buildspec file for the Deployment in the EKS. You will need to make a few edits in the below mentioned file eg: acc-id, ECR name, cluster name.
Note: The Docker File and the Deployment.yaml should be in the repository that you need to access.
version: 0.2
phases:
  install:
    commands:
      - echo Installing app dependencies...
      - curl -O https://s3.us-west-2.amazonaws.com/amazon-eks/1.23.17/2023-05-11/bin/darwin/amd64/kubectl
      - chmod +x ./kubectl
      - mkdir -p $HOME/bin && cp ./kubectl $HOME/bin/kubectl && export PATH=$PATH:$HOME/bin
      - echo 'export PATH=$PATH:$HOME/bin' >> ~/.bashrc
      - echo 'Check kubectl version'
      - kubectl version --client
      - aws --version
      - echo 'Download the binary'
  pre_build:
    commands:
      - aws eks --region ap-south-1 update-kubeconfig --name <EKS CLUSTER NAME FOR ACCESSING>
      - kubectl get nodes
  build:
    commands:
      - echo Build started on $(date)
      - echo Checking Docker daemon...
      - curl -L --no-progress-meter --output /usr/local/bin/docker-compose https://github.com/docker/compose/releases/download/v2.5.0/docker-compose-linux-x86_64
      - sudo chmod +x /usr/local/bin/docker-compose
      - echo Docker daemon is running.
      - echo Logging in to Amazon ECR...
      - aws ecr get-login-password --region ap-south-1 | docker login --username AWS --password-stdin <ACC-ID>.dkr.ecr.ap-south-1.amazonaws.com
      - docker build -t <IMAGE NAME>:latest .
      - if [ $? -ne 0 ]; then
            echo "Docker build failed. Exiting."; exit 1;
        fi
  post_build:
    commands:
      - docker tag <IMAGE TAG>:$CODEBUILD_BUILD_NUMBER
      - docker push <ECR DESTINATION URL>:$CODEBUILD_BUILD_NUMBER
      - if [ $? -ne 0 ]; then
            echo "Docker build failed. Exiting."; exit 1;
        fi
      - echo "Updating image definition in Git repository..."
      - ls
      - OLDTEXT=".*<IMAGE NAMESPACE>/.*"
      - TEXT="        image:\ "<ECR DESTINATION URL>:$CODEBUILD_BUILD_NUMBER""
      - echo $TEXT
      - echo $OLDTEXT
      - sed -i "s,$OLDTEXT,$TEXT," Deployment.yml
      - cat Deployment.yml
      - kubectl apply -f Deployment.yml
      - if [ $? -ne 0 ]; then
            echo "Kubernetes deployment failed. Exiting."; exit 1;
        fi
      - echo "Deployment successful!"
After triggering the pipeline the following is the output of the pipeline:
Conclusion:
In conclusion, automating application deployments with a streamlined CI/CD pipeline ensures consistency, reliability, and efficiency. By integrating your source repository with tools like CodePipeline, CodeBuild, and Kubernetes manifests, you can achieve seamless deployment workflows tailored to your application needs. This approach empowers teams to drive innovation while maintaining robust, automated delivery processes that minimize errors and accelerate time-to-market.
Author: Dharun K, Cloud Engineer